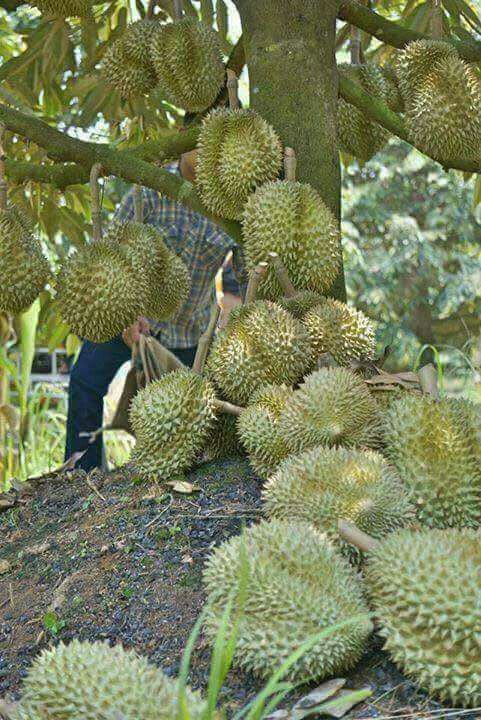
How Grafting Durian Fruit to Get Amazing Durian Tree | Grafting Durian Tree
Durian, or “Duren” as it’s called in many Southeast Asian countries, is known as the “king of fruits” for its unique flavor, strong aroma, and impressive size. But did you know that grafting can help you grow a better, faster-fruiting, and stronger durian tree? In this article, I will share my personal experience and step-by-step method of grafting durian trees to produce amazing, healthy trees that bear fruit earlier than trees grown from seed.
Why Graft a Durian Tree?
Grafting is a horticultural technique that joins the tissues of two plants so that they grow as one. The main reasons to graft durian trees include:
- Faster fruiting: Seed-grown durian trees may take 7–10 years to bear fruit. Grafted trees can fruit in 3–5 years.
- Consistent fruit quality: Grafting ensures you get the same variety of fruit as the parent tree.
- Stronger trees: A hardy rootstock can give the tree better disease resistance and adaptability.
Tools and Materials Needed
Before starting, make sure you have the following tools and materials:
- A healthy durian seedling (rootstock)
- A branch or bud from a mature durian tree that produces good fruit (scion)
- Sharp grafting knife or blade
- Grafting tape or plastic wrap
- Antiseptic or fungicide (optional)
- Clean water
Choosing the Right Time for Grafting
In my experience, the best time to graft durian is during the early rainy season or when the weather is humid and not too hot. This gives the grafted tree a better chance to heal and grow successfully. Avoid grafting during extreme heat or dry weather.
Step-by-Step Process of Grafting Durian Tree
Here is my simple and effective method to graft a durian tree:
1. Select a Healthy Rootstock
Choose a young durian tree that is about 6–12 months old, grown from seed. The rootstock should be:
- Disease-free
- Straight and sturdy
- About 1 cm in diameter
This rootstock will provide strong roots to support the new graft.
2. Select a Good Scion
The scion is a branch taken from a mature, fruit-bearing durian tree that you want to clone. Look for a scion that is:
- Green, but mature (not too young or soft)
- About the same thickness as the rootstock
- Healthy with visible buds
Cut the scion about 10–15 cm in length using a clean, sharp knife.
3. Prepare the Rootstock and Scion
- Make a vertical cut about 3–5 cm deep in the center of the rootstock’s stem (cleft grafting).
- Trim the base of the scion into a wedge shape so that it fits tightly into the cut made on the rootstock.
- Insert the scion wedge into the cleft of the rootstock so that the cambium layers (the green layer beneath the bark) match on at least one side.
4. Tie and Seal the Graft
Use grafting tape, plastic wrap, or even a clean plastic strip to tie the graft tightly. Make sure:
- The scion and rootstock stay firmly in contact.
- The graft is sealed to prevent moisture loss and infection.
- Only the top of the scion is left exposed.
Optionally, apply a fungicide or antiseptic around the graft area to prevent disease.
5. Care After Grafting
- Place the grafted plant in a shaded area away from direct sunlight for about 2–3 weeks.
- Keep the soil moist, but not waterlogged.
- After 2–3 weeks, you should see signs of success: the scion remains green and buds may start to swell.
- After 4–6 weeks, if the graft is successful, new leaves will appear.
Once the graft is strong enough (after 2–3 months), you can gradually introduce the plant to more sunlight and continue regular care.
Tips for Better Success
- Practice: Grafting takes patience and skill. Don’t worry if your first attempt fails.
- Use sharp tools: A clean, sharp blade makes better cuts and reduces damage.
- Clean hands and tools: This prevents the spread of disease.
- Humidity: Keep the environment humid to prevent the graft from drying out.
My Personal Results
I tried grafting durian after being inspired by local farmers. At first, I failed a few times. But after learning the right technique, I successfully grafted three durian trees using scions from a high-quality Monthong durian tree. Within three years, two of them started flowering and fruiting. The fruits were large, sweet, and identical to the parent tree.
Conclusion
Grafting durian trees is one of the best methods to get fast-growing and high-quality durian fruit. While it may take a few attempts to master, the results are worth it. By using a healthy rootstock and scion, applying the correct technique, and giving proper care, you can grow an amazing durian tree right in your garden.
So, whether you’re a farmer, gardener, or just a durian lover, I encourage you to try grafting your own durian tree. It’s a rewarding experience that brings you one step closer to enjoying delicious homegrown durian.