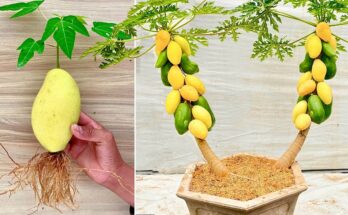
Great… How To Grafting Coconut With Papaya To Get the Most Amazing Fruit
Grafting has always been one of the most fascinating techniques in the world of agriculture. It allows us to combine two different plants into one, giving rise to hybrids that sometimes produce truly remarkable results. Among the many creative grafting experiments, one of the most surprising and intriguing is the grafting of a coconut tree with a papaya plant. While these two plants seem completely different—one being a tall, sturdy palm and the other a soft-stemmed fruit plant—the idea of merging them has captured the imagination of many gardeners. Let’s explore this unique process and learn how to graft coconut with papaya to create an amazing fruit-bearing plant.
Understanding the Concept of Coconut-Papaya Grafting
The coconut tree (Cocos nucifera) and the papaya plant (Carica papaya) are both tropical species that thrive in warm, humid climates. However, they belong to entirely different plant families. Grafting them together is not a conventional method in horticulture, but experimental gardeners have tried it with some surprising success, using innovative techniques to encourage compatibility.
The idea behind grafting coconut with papaya is to combine the strength and longevity of the coconut root system with the fast fruiting ability of papaya. Papaya trees usually bear fruit within 6 to 8 months, while coconuts can take several years. By combining the two, the goal is to create a hybrid plant that grows rapidly, remains strong, and possibly produces a unique kind of fruit that blends the characteristics of both parents.
Materials You’ll Need
Before beginning the grafting process, gather all the necessary materials. Having everything ready will make the process smoother and more effective.
- A young coconut seedling (around 1–2 months old)
- A healthy papaya plant (around 2–3 months old)
- A sharp grafting knife or blade
- Grafting tape or a soft plastic strip
- Natural growth stimulant (like aloe vera gel or coconut water)
- A clean working area and watering can
The key to success is selecting young, actively growing plants that are healthy and disease-free. The younger the tissues, the easier it will be for them to bond and share nutrients.
Step 1: Preparing the Coconut Seedling
Start by preparing your coconut seedling. Choose one that has just sprouted from a fresh coconut and has a soft shoot about 15–20 cm tall. Carefully clean the outer husk around the sprout area to expose the green shoot. Using a sterilized knife, make a clean horizontal cut at the top of the shoot, removing the tip. This will create an open surface for grafting.
You can apply a small amount of coconut water or aloe vera gel on the cut surface to keep it moist and stimulate cell growth. These natural substances act like a growth hormone and help prevent dehydration during grafting.
Step 2: Preparing the Papaya Scion
Next, take the papaya plant that will serve as the scion (the part you’ll attach). Choose a healthy papaya stem about the same thickness as the coconut sprout. Cut a diagonal slice at the base of the papaya stem, ensuring the cut is clean and smooth. The diagonal cut increases the surface area for contact, which is essential for the graft to take successfully.
If possible, choose a papaya variety that produces large, sweet fruit—this increases the chance of obtaining high-quality results once the plant matures.
Step 3: Joining the Two Plants
Now comes the most critical part of the process. Carefully align the cut surface of the papaya stem with the cut surface of the coconut shoot. Make sure both cambium layers (the thin green layer just under the bark) are touching as closely as possible. This contact is crucial because it’s where the nutrient and water transport channels will connect.
Once aligned, secure the joint tightly using grafting tape or a soft strip of plastic. The goal is to hold the two stems firmly in place without damaging them. A good seal will prevent air and moisture from entering the joint, allowing the tissues to heal together naturally.
Step 4: Providing Care After Grafting
After grafting, place the plant in a shaded, humid area where it can recover without too much direct sunlight. Keep the soil moist but not waterlogged. The first 2–3 weeks are critical; during this time, the tissues will attempt to merge.
To encourage bonding, you can apply a natural growth stimulant around the grafting area every few days. Aloe vera, banana peel juice, or diluted coconut water work very well as organic boosters. These help stimulate new cell formation and strengthen the union between the two plants.
Within 3–4 weeks, you should begin to see new signs of growth from the papaya shoot. This indicates that the graft has successfully taken and that the two plants are now sharing nutrients.
Step 5: Transplanting and Maintenance
Once the graft has healed and the plant appears stable, you can transplant it into a larger pot or directly into the ground. Use nutrient-rich soil mixed with compost or organic fertilizer to support fast growth.
Water the plant regularly and ensure it gets 5–6 hours of sunlight daily. However, during the first month after transplantation, avoid harsh midday sun to prevent stress. As the plant grows stronger, it can tolerate more light and heat.
To promote faster fruiting, apply a balanced organic fertilizer every two weeks, and prune any unwanted shoots that may grow below the graft union. This helps the plant focus its energy on developing the grafted section.
Expected Results and Benefits
While not a traditional grafting combination, the coconut-papaya hybrid experiment can lead to fascinating results. Many gardeners report that the papaya grows sturdier, supported by the deep root system of the coconut. Some even notice the papaya fruits becoming larger, juicier, and more aromatic. In certain cases, the plant produces a fruit that has a hint of coconut-like aroma in its sweetness—a truly amazing outcome of natural creativity.
Additionally, the coconut root system provides strong resistance to drought and soil salinity, making the hybrid plant more adaptable to harsh tropical environments. This technique also serves as an educational experiment for anyone passionate about plant biology and innovation.
Conclusion
Grafting a coconut with papaya is more than just a gardening experiment—it’s a demonstration of creativity, patience, and the wonders of nature. Though the process requires careful handling and may not always succeed on the first try, the potential rewards are extraordinary. With dedication and care, you can grow a plant that not only amazes everyone who sees it but also produces some of the most unique and delicious fruits ever imagined.
So, if you love exploring new ideas in gardening, try this great method of grafting coconut with papaya, and you might just discover the next big miracle in tropical fruit growing!Great… How To Grafting Coconut With Papaya To Get the Most Amazing Fruit
Grafting has always been one of the most fascinating techniques in the world of agriculture. It allows us to combine two different plants into one, giving rise to hybrids that sometimes produce truly remarkable results. Among the many creative grafting experiments, one of the most surprising and intriguing is the grafting of a coconut tree with a papaya plant. While these two plants seem completely different—one being a tall, sturdy palm and the other a soft-stemmed fruit plant—the idea of merging them has captured the imagination of many gardeners. Let’s explore this unique process and learn how to graft coconut with papaya to create an amazing fruit-bearing plant.
Understanding the Concept of Coconut-Papaya Grafting
The coconut tree (Cocos nucifera) and the papaya plant (Carica papaya) are both tropical species that thrive in warm, humid climates. However, they belong to entirely different plant families. Grafting them together is not a conventional method in horticulture, but experimental gardeners have tried it with some surprising success, using innovative techniques to encourage compatibility.
The idea behind grafting coconut with papaya is to combine the strength and longevity of the coconut root system with the fast fruiting ability of papaya. Papaya trees usually bear fruit within 6 to 8 months, while coconuts can take several years. By combining the two, the goal is to create a hybrid plant that grows rapidly, remains strong, and possibly produces a unique kind of fruit that blends the characteristics of both parents.
Materials You’ll Need
Before beginning the grafting process, gather all the necessary materials. Having everything ready will make the process smoother and more effective.
- A young coconut seedling (around 1–2 months old)
- A healthy papaya plant (around 2–3 months old)
- A sharp grafting knife or blade
- Grafting tape or a soft plastic strip
- Natural growth stimulant (like aloe vera gel or coconut water)
- A clean working area and watering can
The key to success is selecting young, actively growing plants that are healthy and disease-free. The younger the tissues, the easier it will be for them to bond and share nutrients.
Step 1: Preparing the Coconut Seedling
Start by preparing your coconut seedling. Choose one that has just sprouted from a fresh coconut and has a soft shoot about 15–20 cm tall. Carefully clean the outer husk around the sprout area to expose the green shoot. Using a sterilized knife, make a clean horizontal cut at the top of the shoot, removing the tip. This will create an open surface for grafting.
You can apply a small amount of coconut water or aloe vera gel on the cut surface to keep it moist and stimulate cell growth. These natural substances act like a growth hormone and help prevent dehydration during grafting.
Step 2: Preparing the Papaya Scion
Next, take the papaya plant that will serve as the scion (the part you’ll attach). Choose a healthy papaya stem about the same thickness as the coconut sprout. Cut a diagonal slice at the base of the papaya stem, ensuring the cut is clean and smooth. The diagonal cut increases the surface area for contact, which is essential for the graft to take successfully.
If possible, choose a papaya variety that produces large, sweet fruit—this increases the chance of obtaining high-quality results once the plant matures.
Step 3: Joining the Two Plants
Now comes the most critical part of the process. Carefully align the cut surface of the papaya stem with the cut surface of the coconut shoot. Make sure both cambium layers (the thin green layer just under the bark) are touching as closely as possible. This contact is crucial because it’s where the nutrient and water transport channels will connect.
Once aligned, secure the joint tightly using grafting tape or a soft strip of plastic. The goal is to hold the two stems firmly in place without damaging them. A good seal will prevent air and moisture from entering the joint, allowing the tissues to heal together naturally.
Step 4: Providing Care After Grafting
After grafting, place the plant in a shaded, humid area where it can recover without too much direct sunlight. Keep the soil moist but not waterlogged. The first 2–3 weeks are critical; during this time, the tissues will attempt to merge.
To encourage bonding, you can apply a natural growth stimulant around the grafting area every few days. Aloe vera, banana peel juice, or diluted coconut water work very well as organic boosters. These help stimulate new cell formation and strengthen the union between the two plants.
Within 3–4 weeks, you should begin to see new signs of growth from the papaya shoot. This indicates that the graft has successfully taken and that the two plants are now sharing nutrients.
Step 5: Transplanting and Maintenance
Once the graft has healed and the plant appears stable, you can transplant it into a larger pot or directly into the ground. Use nutrient-rich soil mixed with compost or organic fertilizer to support fast growth.
Water the plant regularly and ensure it gets 5–6 hours of sunlight daily. However, during the first month after transplantation, avoid harsh midday sun to prevent stress. As the plant grows stronger, it can tolerate more light and heat.
To promote faster fruiting, apply a balanced organic fertilizer every two weeks, and prune any unwanted shoots that may grow below the graft union. This helps the plant focus its energy on developing the grafted section.
Expected Results and Benefits
While not a traditional grafting combination, the coconut-papaya hybrid experiment can lead to fascinating results. Many gardeners report that the papaya grows sturdier, supported by the deep root system of the coconut. Some even notice the papaya fruits becoming larger, juicier, and more aromatic. In certain cases, the plant produces a fruit that has a hint of coconut-like aroma in its sweetness—a truly amazing outcome of natural creativity.
Additionally, the coconut root system provides strong resistance to drought and soil salinity, making the hybrid plant more adaptable to harsh tropical environments. This technique also serves as an educational experiment for anyone passionate about plant biology and innovation.
Conclusion
Grafting a coconut with papaya is more than just a gardening experiment—it’s a demonstration of creativity, patience, and the wonders of nature. Though the process requires careful handling and may not always succeed on the first try, the potential rewards are extraordinary. With dedication and care, you can grow a plant that not only amazes everyone who sees it but also produces some of the most unique and delicious fruits ever imagined.
So, if you love exploring new ideas in gardening, try this great method of grafting coconut with papaya, and you might just discover the next big miracle in tropical fruit growing!